Monday, December 28, 2009

Heavenly Cake Bakers: English Gingerbread Cake

Hello folks, I'm finally getting around to posting about the Heavenly Cake Bakers' choice for last week -- English Gingerbread Cake.


For this group, we don't post the recipes, but you can find it in "Rose's Heavenly Cakes."

The recipe calls for Lyle's Golden Syrup or light corn syrup. Lots of it (1 1/4 cups). I had both in the cupboard, but even after scraping out both containers, I wasn't quite up to the full measure. So I added about 3 tablespoons of molasses, and used white sugar instead of brown sugar. I also had a feeling that this cake would not be gingery enough for me (only 1 teaspoon of ground ginger), so I added about 1/2 teaspoon grated fresh ginger and 1.5 ounces (1/3 cup) minced candied ginger.

The cake batter seemed very bubbly when I put it into the pan. It rose a lot, then fell in the middle. I think it was overleavened. I'm quite sure I measured the leavening correctly -- and I didn't mix them up either -- so I wonder if perhaps the culprit was the extra molasses. It might have added extra acidity and caused more of a reaction with the baking soda. Just a thought.


Because of the fallen center, I decided to turn the cake upside down for serving. Here it is, brushed with the lemon syrup.


And the verdict? Wonderful texture, except in the very center -- light yet moist. Great flavor, but even with the extra ginger, it wasn't quite gingery enough. The lemon syrup added a wonderful note.

Next time? Oh yes, there will be a next time. I think I will use a few tablespoons of molasses again -- I liked the flavor. But I will reduce the baking soda a bit. And definitely add more ginger -- about 1 1/2 teaspoons dried, 1/2 to 1 teaspoon fresh, and 2 ounces candied. No subtle gingerbread in this house!

This was wonderful just plain. But I've been wanting to try a cream-cheese sauce ever since I read this passage in Robin McKinley's "Sunshine" --

"I'd made my special cream-cheese sauce to go with the triple-ginger gingerbread. I'd long felt that gingerbread, while excellent in itself, was still essentially an excuse to eat the sauce, so I'd always made twice as much per portion as the original recipe called for. Then it turned out that some of our customers were even more crazed than I was, so I started making three times as much, and we served it in little sauceboats. You got purists occasionally that didn't want any sauce, but the slack was taken up somehow."

Doesn't that sound good? Anybody have a good recipe for cream-cheese sauce?

About the book "Sunshine" -- if you like vampire stories with scary, sexy vampires, lots of dark humor and irony, and a heroine who seems to be called to deal with the vampires but really just wants to get on with her everyday life (being a baker) -- then you'll like this book. And if you like to bake, you'll covet her recipes. I keep wondering -- what are Lemon Lust, Butter Bombs, Bitter Chocolate Death, or Hell's Angelfood?

Oh hey, Robin McKinley has a recipe section on her blog -- I'll have to go over and take a look!

Sunday, December 20, 2009

Heavenly Cake Baker: Classic Carrot Cake (late)

Hello, Heavenly Cake Bakers! At last I am getting around to telling you about my experience with making the Classic Carrot Cake from "Rose's Heavenly Cakes."

Sorry, no pictures. I mislaid my camera for a few days, See, we were having our old (late 1920's) windows rehabbed. Just the inside windows -- the storm windows stayed in place, thank goodness! But it still involved a lot of moving things around, which is how the camera came to be buried under/behind other stuff for a while. (It has since reappeared, but not in time to take pictures of the cake.)

I made the full recipe for the cake and baked it in a 9x13 inch cake pan. That worked well. The cake domed slightly in the middle, so I was glad I did not reduce the leavening.

This recipe is exactly what it says, "classic." Not too heavy, not too light, rich but not oily, very well-balanced in flavor and texture. It met with universal approval. The only thing I'd change next time is to remember to reduce the cinnamon when using the very, very spicy Vietnamese cinnamon. I like spicy cinnamon, but this was just a bit too much.

And ah, the Dreamy, Creamy White Chocolate (and cream cheese) Frosting! I'd made the original white chocolate and cream cheese frosting from "The Cake Bible" once before, and felt it was just too "white-chocolate" tasting. As I've said before and no doubt will say again, I don't like the taste of white chocolate. So, this time I decided to do a sort of "half-and-half" version. Rose does give a "no white chocolate" variation at the bottom of the recipe (p. 124). I combined the recipes -- for the full amount of cream cheese, butter, and sour cream, I used 2.0 ounces of confectioners' sugar, 1/8 teaspoon of vanilla, and 4.5 ounces of Green and Black white chocolate.

The recipe in the Cake Bible calls for mixing the frosting in a bowl -- I love the new Heavenly Cakes method of mixing in a food processor! And the result really is "Dreamy and Creamy" as Rose calls it -- even with only half the white chocolate. The word that kept coming to my mind was "suave." We're talking suave like Cary Grant in an old movie, people! Wow!

By the way, whatever happened to suave leading men? Nowadays it's only villains who are suave (in a creepy or deceptive sort of way). Well, maybe James Bond is still suave -- I haven't seen any of the recent movies so I don't know for sure. I miss it. Let's bring back suave!

Back to the cake -- this version kept the white chocolate taste enough in the background that I liked it. And let's face it, there is nothing like cocoa butter for that fabulous mouth feel -- the way it melts just at body temperature -- o0h...

Some of this went to work, some got eaten at home, and the window rehabbing guy also got some. (I think he enjoyed this job.)

If you live in the Madison, Wisconsin, area and have old windows that you want to repair rather than replace, I highly recommend you look up Larry of Sashman Service in the business pages. Tell him Barbara and Jim in Mazomanie sent you. He'll do a great job and he's a nice guy, too. No, he's not super cheap, but nobody who does a really good job is super cheap. It's still a lot less expensive than having new inner windows put in -- and much more authentic, too.

And if you're looking for a really, really good classic carrot cake, you need look no farther than this recipe. Take a look at this book, folks, you won't regret it!

Wednesday, December 9, 2009

TWD Follow-Up: Sablé Science Experiments

This week's TWD recipe inspired me to try some variations.

Since I studied science in college, and have a number of scientists and engineers in my ancestry, I decided to do some science experiments with these sablés. What would happen if I varied just one ingredient? Such as the type of flour, or sugar, or egg?

First experiment: type of flour. What happens if you use flour with a different protein content? I made one half-batch with unbleached all-purpose flour and one with unbleached pastry flour, measuring the flour by weight. Both were lemon-flavored and shaped into logs.


The ones with the yellow dot on top were the pastry flour ones. (The dot was made with egg, water and food coloring beaten together).

Results: unfortunately I underbaked the all-purpose flour batch a bit. This made comparing the two more difficult. Drat. Next time, I must remember to bake some of each batch at once. Because of the underbaking, the all-purpose flour ones were a bit doughy in the center. But by tasting just around the edges, I could make a pretty good comparison. The pastry flour ones were just a tiny bit more tender, the all-purpose flour ones were just a tad more chewy. But the difference was very slight and both were good. I also noticed that the pastry flour ones spread a bit more. This might be because lower-protein flour absorbs a bit less water, making the dough slightly more moist.

Second experiment: type of egg. I made two half-batches, one using an egg yolk (19 grams), one using one-half a whole egg (25 grams). Both were lime-flavored and used my standard "pastry and tender cookie" mixture of half all-purpose flour and half pastry flour. (I used the zest of one small lime for each half-batch.)


Results: The ones with the green dot were the whole-egg batch. There was a definite visual difference here -- the whole-egg ones were a stickier dough, spread more, and had a more open texture. The little rectangles were actually the same size and shape before baking. Part of this difference might have been because of the extra 6 grams of liquid egg; some was probably due to the difference in fat and emulsifier content. (Egg yolks have more fat and more natural emulsifiers.) Taste tests showed the whole-egg cookies were more crisp and light, while the egg-yolk ones were more smooth, rich and suave, but still "sandy". The taste difference was small but the texture difference was quite noticeable.

Third experiment: type of sugar. I made one half-batch with the mixture of granulated sugar and confectioners' sugar that Dorie recommends, and another using an equal weight of all superfine sugar. These were unflavored. Both batches were made with blended all-purpose/pastry flour, and with 20 grams of whole egg.


Results: Well, I forgot to label the rolls! I guess I was running out of energy at that point. So I don't know if the green cookies or the red cookies have the original sugar mixture. Sigh. Reducing the whole egg to 20 grams did solve the problem of the really sticky dough, but both batches still spread more and had a more crisp, open texture than the egg yolk ones. But the good news was, I couldn't tell any difference between the red and green ones. The textures were the same.

Overall Conclusions:

1) Unbleached all-purpose flour vs. unbleached pastry-flour -- the difference is barely noticeable.

2) Egg yolks vs. whole eggs -- the difference is noticeable. Just egg yolks give a cookie that spreads less with a more firm, even, but still "sandy" texture. The egg whites in the whole egg make for a crisper, more open-textured dough that spreads more. These things are always a matter of taste, and I liked them both. I have a feeling the egg yolk ones are more authentic, but personally I liked the crisp texture of the whole-egg ones. Just be sure to use the same amount of egg by weight or volume - about 38-40 grams for a whole recipe.

3) I couldn't tell the difference between the mixed-sugar batch and the superfine sugar batch. So, take your pick. It's easy to make your own superfine sugar by grinding regular sugar in a food processor. It would be interesting to compare a batch with all granulated sugar and all confectioners' sugar -- I'm sure that would make a difference.

And hey, what about comparing different regular butter to cultured butter to high-fat Euro-style butter? These cookies are so simple that they really reveal the differences in ingredients.

Other thoughts -- I would like these a just bit less sweet. I'm going to reduce the total amount of sugar down to about half the weight of the butter -- say, 100-110 grams for a whole batch. That's just a matter of my personal preference. I've made shortbread this way and the sweetness level was just right for my taste.

Also, the lemon and lime flavors were pretty subtle. I might increase the amount of zest next time -- I like my citrus cookies zingy!

Tuesday, December 8, 2009

TWD: Sablés

This week's recipe for Tuesdays with Dorie is for the French shortbread-style cookies known as Sablés, chosen by -- me! (For the recipe, scroll down to the bottom of this post.)


When I joined TWD in June of 2008, I wasn't really concerned about when I would get to choose a recipe. I figured I'd just try these blogging and bake-along activities for a while and see if I liked them. And the rest is history...

Thank you to our founder Laurie and all the TWD bakers for such a great time! I hope you enjoyed these cookies and look forward to seeing all your variations. I made three batches -- plain sablés rolled in colored sugar, lemon sablés, and lime sablés shaped as rectangles. (I used whole beaten egg rather than egg yolk to brush the outsides of the sugared ones. I have too many left-over egg whites already!)

Why do some of them have yellow or green dots on top, you may ask? Good question! Come back Tuesday evening for my post on the results of the Sablé Scientific Experiments. (Sorry, it took until Wednesday but the results are up now.)

Meanwhile, here are three hints for shaping cookie dough logs. This first one is from one of Nick Malgieri's cookbooks -- put the dough on wax paper, wrap the paper around and leave a "tail" (see picture), and use something thin and firm to push/pull the roll into shape. (I used a thin plastic cutting mat.) Push your mat (or whatever) into the fold of the wax paper and gently pull the bottom layer of wax paper towards you. Don't be too vigorous or you'll tear the wax paper (parchment is stronger, but more expensive).

Tightening the roll

Second, here's a nice way to make sure your logs don't flatten out when you chill them -- cut open the cardboard tube from the center of a paper towel roll, and use it to hold the wrapped dough until it is firm.

And when you slice the rolls, rotate them a bit after every one or two cuts. It keeps them from flattening too much on one side.

Edited to add: thanks to the folks who noticed that these last two hints are also in Dorie's book, on page 137.

For the rectangular lime sablés, I used Dorie's trick from the Pecan Shortbreads on page 127, and put the dough into two small plastic bags to chill. I ended up with two rectangles, each about 6 inches by 6 1/2 inches. Then I used a ruler and a long knife to cut them into smaller rectangles.
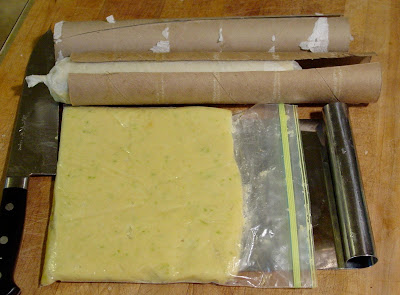
Sablé shaping tools

How do they taste? Well, they've only been out of the oven an hour or so. They're good now, but I know from previous experience that Dorie is right -- they are much better the next day. It's so hard to wait...

Recipe

from "Baking: From My Home to Yours," pages 131-133
by Dorie Greenspan
(Note: weights added by Bungalow Barbara)

Sablés, rich, tender shortbread cookies, are as popular in France as chocolate chip cookies are in America. And for several good reasons: the pure flavor of butter, the cookie's key player; a paradoxical but paradisical texture -- the cookie is both crumbly and melt-in-your-mouth tender; and it has an anytime rightness that makes it as perfect with a tall glass of milk, a bowl of ice cream or a basket of berries as it is on a petits fours tray in France's grandest restaurants. I learned to make sablés in Paris working with some of the city's best pâtissiers, and this master recipe is based on what they taught me -- the Playing Around variations are my American riffs on their standard.

The dough for sablés is shaped into logs and then sprinkled with sugar before it is sliced and baked. During the year, I coat the logs with sparkly white decorating sugar. When the holidays come around, I double the recipe and go mad with color, sprinkling some of the logs with brilliant red sugar, some with green and some with a rainbow mix. Trimmed in color and packed in festive tins, these make terrific Christmas cookies.

If you're new to sablés, take a look at the pointers (below) before you set to work.

2 sticks (1 cup / 8 ounces / 227 grams) unsalted butter, at room temperature
1/2 cup sugar (3.5 oz. / 100 gm.)
1/4 cup confectioners' sugar, sifted (1.0 oz. / 28 gm.)
1/2 teaspoon salt, preferably fine sea salt
2 large egg yolks (7 teaspoons / 35 ml. / 1.3 oz. / 37 gm.), at room temperature, plus 1 large egg yolk, for brushing the logs
2 cups all-purpose flour (9.6 oz. / 272 gm.)
Decorating (coarse) sugar

Makes about 50 cookies

Working with a stand mixer, preferably fitted with a paddle attachment, or with a hand mixer in a large bowl, beat the butter at medium speed until smooth and very creamy. Add the sugars and salt and beat until well blended, about 1 minute. The mixture should be smooth and velvety, not fluffy and airy. Reduce the mixer speed to low and beat in 2 of the egg yolks, again beating until the mixture is homogeneous.

Turn off the mixer. Pour in the flour, drape a kitchen towel over the stand mixer to protect yourself and the counter from flying flour and pulse the mixer at low speed about 5 times, a second or two each time. Take a peek -- if there is still a lot of flour on the surface of the dough, pulse a couple more times; if not, remove the towel. Continuing at low speed, mix for about 30 seconds more, just until the flour disappears into the dough and the dough looks uniformly moist. (If most of the flour is incorporated but you've still got some in the bottom of the bowl, use a rubber spatula to work the rest of the flour into the dough.) The dough will not clean the sides of the bowl, nor will it come together in a ball -- and it shouldn't. You want to work the dough as little as possible. What you're aiming for is a soft, moist, clumpy (rather than smooth) dough. Pinch it, and it will feel a little like Play-Doh.

This is how you want your dough to look. (This is a half-batch.)

Scrape the dough out onto a smooth work surface, gather it into a ball and divide it in half. Shape each piece into a smooth log about 9 inches long: it's easiest to work on a piece of plastic wrap and use the plastic to help form the log. Wrap the logs well and refrigerate them for at least 3 hours, preferably longer. (The dough can be kept in the refrigerator for up to 3 days or frozen for up to 2 months.)

GETTING READY TO BAKE: Center a rack in the oven and preheat the oven to 350 degrees F. Line two baking sheets with parchment or silicone mats.

Remove a log of dough from the refrigerator, unwrap it and place it on a piece of parchment or wax paper. Whisk the remaining egg yolk until it is smooth, and brush some of the yolk all over the sides of the dough -- this is the glue -- then sprinkle the entire surface of the log with decorating sugar.

Trim the ends of the roll if they're ragged, and slice the log into 1/3-inch-thick cookies. (You can make these as thick as 1/2 inch or as thin as -- but no thinner than -- 1/4 inch.) Place the rounds on the baking sheets, leaving an inch of space between them.

Bake one sheet at a time for 17 to 20 minutes, rotating the baking sheet at the midway point. When properly baked, the cookies will be light brown on the bottom, lightly golden around the edges and pale on top; they may feel tender when you touch the top gently, and that's fine. Remove from the oven and let the cookies rest a minute or two before carefully lifting them onto a rack with a wide metal spatula to cool to room temperature.
(Note from Barbara: mine only took about 14-15 minutes to bake. I did slice them fairly thin.)

Repeat with the remaining log of dough, making sure the baking sheets are cool before you bake the second batch.

SERVING: Serve these with anything from lemonade to espresso.

STORING: The cookies will keep in a tin at room temperature for about 5 days. If you do not sprinkle the sablés with sugar, they can be wrapped airtight and frozen for up to 2 months. Because the sugar will melt in the freezer, the decorated cookies are not suitable for freezing.

Playing Around

LEMON SABLÉS: Working in a small bowl, using your fingers, rub the grated zest of 1 to 1 1/2 lemons (depending on your taste) into the granulated sugar until the sugar is moist and very aromatic, then add this and the confectioners' sugar to the beaten butter. (Sablés can also be made with orange or lime zest; vary the amount of zest as you please.)

PECAN SABLÉS: Reduce the amount of flour to 1 1/2 cups, and add 1/2 cup very finely ground pecans to the mixture after you have added the sugars. (In place of pecans, you can use ground almonds, hazelnuts or walnuts.) If you'd like, instead of sprinkling the dough logs with sugar, sprinkle them with very finely chopped pecans or a mixture of pecans and sugar.

SPICE SABLÉS: Whisk 1 1/2 teaspoons ground cinnamon, 1/2 teaspoon ground ginger and 1/4 teaspoon freshly grated nutmeg into the flour.

PARMESAN SABLÉS: For savory sablés that are ideal with aperitifs, omit both the granulated and confectioners' sugar and add 3/4 cup (2 1/4 ounces) very finely grated Parmesan to the beaten butter. These are fine plain, but the logs can also be brushed with beaten egg yolk and sprinkled with finely chopped almonds. If you love salt, press a few grains of fleur de sel gently into the top of each sablé before slipping the baking sheet into the oven.

Tips for Shortbreads and Sablés, from p. 124 of "Baking: From My Home to Yours"

What you call the fabulously buttery, slightly gritty, tender, sandy-textured cookies that are so right with tea or coffee may depend on where you live. In France, the cookies are known as sablés, galettes or palets; in Scotland, they're shortbread; and here, at home, they are shortbread, sand tarts or simply butter cookies.

At their most elemental and traditional, shortbreads and their kin are made of butter, sugar -- either granulated or confectioners', or a combination of the two -- and flour. And, although some recipes have an egg or two, or maybe just yolks, it's not the eggs that define the cookies, it's the other ingredients and, most important, how you handle them.

Here's all you need to know to get perfectly crumbly shortbread or sablés every time.

  • Use fresh butter that is soft, but not at all greasy -- if your butter is sitting in an oily puddle, it's gone too soft and your sablés won't have their characteristic sandiness.

  • Don't beat the butter (or the butter, sugar and eggs) so enthusiastically that the mixture is light and fluffy. You don't want to beat air into this dough, because it would cause the cookies to puff as they bake in the oven and sink as they cool on the counter.

  • Be soft and gentle when you blend in the flour. This is the make-or-break step in the process. With the word "sandy" singing in your head, add the flour all at once and mix it only until it disappears into the dough. To guard against overmixing, you can mix in the last of the flour by hand.

  • Shape the dough as the recipe directs and then make sure to give it a good, long chill; it will improve the flavor of the cookies and help them keep their shape under the oven's heat. Try to refrigerate the dough for at least 2 hours, but know that longer is better.

  • Cool the cookies completely before you serve them. As seductive as the smell of warm butter, sugar and flour is, the cookies taste better when they reach room temperature.

You can also find the recipe at this link on the NPR web site (scroll down a bit). And for tips on cookie-baking in general, see this link. Edited to add: thanks for the folks who spotted the recipe at this link as well -- and see the article, too!

Friday, November 27, 2009

TWD: Chocolate Caramel Chestnut Cake

Happy Thanksgiving!

One of the choices for November's "Tuesdays with Dorie" was the Chocolate Caramel Chestnut Cake, chosen for November 3 by Katya of Second Dinner. It's a fancy cake, with layers of cake made with chestnut spread, moistened with a brandy syrup, filled with caramel-milk chocolate ganache and chopped chestnuts, frosted with more ganache. And as if that's not enough, then you glaze it with a darker ganache and top it with gilded chestnuts. Yikes! You can find the recipe on Katya's blog or on Epicurious.


This is a half-recipe, made in a 6-inch square pan. Looks fabulous, doesn't it? I really liked how it tasted, too. It was a great Thanksgiving dessert.

I'm going to blather on at great length about this cake, so here's a quick summary:

1) This was the first time I cooked with chestnuts -- or ate them. I think they're kind of bland and boring now that I've tried them. But it was worth a try! (Oh, and I didn't gild them.)

2) Despite my opinion of chestnuts, I loved the cake!

3) Instead of Dorie's glaze, I used the Chocolate Lacquer Glaze from "Rose's Heavenly Cakes." Shiny!

One reason I wanted to make this cake was the sheer challenge of the recipe. Another was that it gave me an excuse to try chestnuts. I've never had them. After tasting both canned chestnuts and fresh, home-roasted chestnuts, I'm sorry to say that my opinion is "meh." They're not like other nuts -- more starchy, softer, less "nutty," with a mild, earthy taste that I don't dislike, but don't go crazy for either.

And as my husband pointed out, "They look weird. Like little brains." Oh, thanks for that image, love!

On one of my shopping trips to "the big city" (Madison, WI), I looked around for chestnuts. No fresh chestnuts at that time (they've arrived now, though). No sweetened chestnut spread (and I visited quite a few stores). I did find canned chestnuts at Whole Foods and sprang for a 10-ounce jar.

Having tasted them and found them bland, I decided to see if I could dress them up with a caramel glaze.


It looked like it was going to work, but a problem soon developed. Despite draining and drying the canned chestnuts, they still were so moist that the caramel wouldn't stick. And after a overnight stay in the refrigerator, the hard caramel glaze had turned into runny (but delicious) caramel syrup.

Since I couldn't find the chestnut spread, I made my own. Note to self: if I do this again, do NOT put the chestnuts into caramel syrup first. It made for a sticky mess that refused to turn into a paste, even after trips through my mini-food processor and blender. Eventually I had to push it through a sieve. It did taste lovely, though, after the addition of vanilla extract and enough water to make it spread-able. So far this is my favorite way to eat chestnuts. It's lovely on toast made from Jim's home-made bread!

Here's the cake - the chestnut spread gives it a nice color.


Sorry, no pictures of making the caramel-milk chocolate ganache filling. I'm not usually a fan of milk chocolate, but this ganache was luscious.

Here are the chopped chestnuts for the filling. They'd been soaking in the caramel syrup for a couple of weeks. I also mixed some of the caramel syrup with brandy and used that to syrup the cake.


Here's the cake after filling and frosting with the ganache. Then it went into the refrigerator overnight.


At this point I departed from Dorie's recipe and made the super-shiny Chocolate Lacquer Glaze from Rose Levy Beranbaum's new book, "Rose's Heavenly Cakes." It's easy to make, but alas, it thickened up quickly when I poured it on the cold cake. The recipe called for bringing it to 85 degrees before pouring, and I did, but for a really cold cake like this one, I think you need a higher temperature. Still, it looks pretty good. If you want to see what it should look like, check out this post by Rachel of the Heavenly Cake Bakers. Now, that's shiny!

Unfortunately, my whole chestnuts had been sitting in the refrigerator for two weeks, and I'd made the mistake of not storing them in the caramel syrup. They turned into a science experiment. Oops! By that time, fresh chestnuts were coming into the stores -- so I bought a few and roasted them in the microwave. Those are the ones on top of the cake. Sorry, fresh-roasted chestnuts still are "meh" as far as I am concerned. But it was fun to try it out!


After all these lukewarm statements about chestnuts, you'll probably be surprised to hear that I really liked the cake. The flavors were all subtle and blended well together, and it was so elegant! I do wonder how it would turn out with hazelnuts...bet I'd like it even better.

Wednesday, November 25, 2009

Heavenly Cake Bakers: Catalan Salt Pinch Cake

This week's cake for the Heavenly Cake Bakers was the Catalan Salt Pinch Cake. Despite the name, there's no salt at all in the recipe. But the "pinch" part is because the traditional way to eat it is to pinch off pieces with your hands.


How could I resist? I love eating with my hands -- to the despair of my parents and now my husband.

I did make a few changes to the recipe -- I used Trader Joe's almond meal, so I didn't have to grind up the almonds. I just spread the almond meal out on a baking sheet and toasted it in the oven until it smelled nice and "toasted almond-y" -- about 7 to 10 minutes. I used 6 tablespoons of Turbinado sugar, after grinding it in my food processor and sifting it to remove any larger crystals that were still left. For the rest of the sugar, I used regular white sugar, also ground fine in the food processor. And I added about 1/4 teaspoon of salt, because how could I make a cake called a "salt" cake without salt? (OK, OK, Rose says it's the name of a bakery and a village. But I still wanted the salt.)

This is a simple sponge cake using a mixture of ground almonds and flour, and a mixture of whole eggs and egg whites. You beat the egg whites to soft peak stage first, then add in a whole lot of sugar and beat again. I had a moment of panic at this point, because the egg whites became very liquid and runny. It was plain they were never going to get back to "soft peak" stage, let alone to "firm peak" stage. But wait! Rose doesn't say they should! You just have to beat until they are "very thick." OK, I can do that. They looked like marshmallow fluff sauce. Then stir in the almond meal and remaining sugar.

Now we beat in the whole eggs (and salt, in my case). Easy? Not easy if you only have a hand-held electric mixer...you have to beat the eggs in very slowly, taking 20 to 25 minutes. Even with switching hands, I was getting tired of holding that mixer! The scene from "Like Water for Chocolate" came to mind, the one where she is beating the batter for her sister's wedding cake and weeping into the batter. My love life is in much better shape than hers, but I was feeling a bit like weeping too.

Really, what did people do before electric mixers? Maybe they only made egg foam cakes for very special occasions -- or if they had servants to beat the egg foam for them.

I think I must be developing some "cake intuition" -- after about 25 minutes of beating, I could see a change in the egg foam and it seemed "done." It was light and foamy, and had thickened enough to show the marks of the beaters.

OK, fold in the lemon zest and flour. Pinch out any lumps of flour. (Did I mention I love using my hands?) At this point I remembered (too late) that Shirley Corriher has some useful tips on folding flour into sponge cakes in her new book "Bakewise." One of them is to reserve some of the sugar and mix it with the flour. Oh well, maybe next time.

Into the pan and into the oven. After 20-some minutes, my "cake intuition" told me the cake was not quite done -- and so did the toothpick test. Bake a little longer, ah, now it looked and felt done. It had puffed up nicely and hadn't started to fall -- but it did fall in the center once it came out of the oven.

We had great fun pinching off pieces and eating them! Other than that, though, Jim was just lukewarm about this cake. He is just not a fan of sponge cakes. I liked it better -- I am a fan. I love the open, springy texture and airy lightness of sponge cakes. Still, I thought this one was a touch too sweet and had a faint "eggy" taste that I didn't like. The lemon flavor was barely there, the toasted almond flavor and the raw sugar flavor were present but not strong. I'd like this better with more flavor, at least when eaten by itself. I'm thinking a touch of almond extract, and maybe some orange zest and cinnamon. And I'd also like to test it with a fruit topping. Sponge cakes are so great at soaking up those fruit juices...

But truthfully, I'm not sure I'll make this exact recipe again. If I'm going to spend a long time beating an egg foam, I think I'd prefer an almond génoise -- because I get to add lovely browned butter! Can I still eat it with my hands? Please?

Tuesday, November 24, 2009

TWD: All-in-One Holiday Bundt Cake

One of our options for "Tuesdays with Dorie" this month was the All-in-One Holiday Bundt Cake, chosen by Britin of The Nitty Britty. It's a pumpkin-spice cake with add-ins of chopped apples, cranberries, and pecans. Perfect for the fall season!


Doesn't it look delicious? Well, it was! You can find the recipe here or here or here.


The recipe says you can add a maple-flavored frosting, but that seemed like overkill. A light dusting of powdered sugar was just right.


I saved a couple of slices for my husband -- and took the rest into work in my "new" antique cake carrier. (An early birthday present from aforesaid sweet husband -- purchased on eBay.) Shiny!


We'd all had a rough week at work and this hit the spot!

Monday, November 16, 2009

Heavenly Cake Bakers: Woody's Lemon Luxury Cake -- well, almost

The Heavenly Cake Bakers' project for this week is Woody's Lemon Luxury Cake -- a lemon-flavored yellow butter cake (with white chocolate in the batter), layered with lemon curd, and frosted with a white chocolate-vanilla-lemon buttercream.


Mine is actually a Lemon "Whisper of Luxury" White Cake. Let me explain.

The full recipe calls for 13 egg yolks, 4 whole eggs, 17.8 ounces of butter and 16.6 ounces of white chocolate. Whew! Even with Green & Black's white chocolate on sale at the co-op, the monetary and calorific cost of the cake was scaring me. And then there was the thought of all those left-over egg whites. Do you know how many containers of egg whites are already in my freezer? (Good, then you can tell me, because I've lost track...too many, is all.)

But my taste buds wanted this cake. I love lemon! OK, I'll make a half recipe of the cake and bake it in 6-inch round pans instead of 9-inch round pans. And I'll make 3/4 of the recipe for the frosting, because I'll probably need more than half. (At some point I'd like to make a post explaining the math for this. But maybe not now.)

And, to help with the egg white problem, I'll make it a white cake instead of a yellow cake. Hey, if you turn to page 48 of Rose's earlier book, "The Cake Bible," you'll find the basis for this cake recipe -- the Golden Luxury Cake. It's virtually identical to this recipe - except the Lemon Luxury has very slightly less baking powder, adds a teaspoon of lemon zest, and is baked in deeper pans. And if you flip ahead a page in the Cake Bible, you'll find the White Velvet Whisper Cake. Guess what? It's identical to the Golden Luxury Cake, except it uses 4 1/2 egg whites instead of 6 egg yolks. Aha! A way to use some of those extra egg whites from the lemon curd!

After some time with a pencil and calculator, the first step was the lemon curd -- 3/4 of the recipe. Some of it goes into the frosting and the rest is used for filling and decorating. You might think measuring 3/4 of 7 egg yolks would be hard, but I just used my scale. Weighing is the way to go!


The last time I made lemon curd, it turned out a bit runny, so I cooked this a bit longer. See how it mounds up? Actually, my test for done-ness is to run the spatula across the pan, scraping all the way to the bottom. You should be able to see the bottom of the pan briefly before the curd oozes slowly back, and the marks of the spatula should fade away quite slowly. I've tried going by temperature, but mine never seems to get as hot as it is supposed to.

I love how Rose has you mix the softened butter in with the eggs. Yes, it's a bit more of a pain to wait for it to soften, but the curd just does not lump. You hardly have to strain it - although I did, just in case.

OK, put the curd into the fridge to cool and gather up and measure ingredients for the cake and frosting. Leave in a corner of the kitchen counter overnight. See? I just have to bring out the egg whites and milk from the fridge -- and later, the eggs for the frosting.


All went well with mixing the cake batter until I began to pour the batter into the pans. "Gee, this seems awfully thin," I thought, and then it struck me. The white chocolate! I forgot to add it! There it was, resting on the counter behind me as it cooled. Drat. I should have put it on the same counter. So I scraped the batter back into the mixing bowl, and mixed in the white chocolate. Ah, now it was nice and thick.

No way was I washing out the pans, drying them, cutting new rounds of waxed paper -- nope, I just wiped away the small amount of remaining batter with a damp paper towel and put on some more "pan goop." (Shortening, oil, flour. Thanks to Alton Brown, there is always some of this in my freezer.)


There really didn't seem to be much batter. It only came about 1/4 to 1/3 of the way up the sides of the pan. Hmm. I don't understand. I really didn't lose that much batter with the mistake -- I was very thorough about scraping it back out of the pans. Oh well, into the oven.

They rose nicely. But it was interesting how differently the two cakes baked. The one with the red silicone strip baked considerably faster, despite having a little more batter in the pan. It domed more, and the edges got brown. The one with the Wilton fabric strip took 5 minutes longer to bake. It was more even and did not get brown at the edges. And even though I baked it longer, it came out dense and underbaked. (It's the bottom layer in the finished cake.)

Layer 1: Silicone cake strip


Layer 2: Fabric cake strip

My comparison was not quite fair -- I overlapped the Wilton strip on itself, so most of the cake had two layers of cake strip. I don't think this was a good idea -- it gave too much insulation. And of course there is always the possibility that my oven heats differently on one side.

Both cakes shrank and fell a lot after a few minutes out of the oven. And they were hard to get out of the pans -- but I blame that on my mistake. Some batter had gotten under the wax paper liners and they stuck. In fact, the fabric-strip cake cracked in half. Oh well, the frosting will cover it all up.

So, on to the frosting. First, melt white chocolate and butter together. Thank goodness for Kristina's post about this, or I would have panicked! By the time the white chocolate bits were melted, the mixture had separated into a grainy mess with melted butter floating on top. (It was about 110 F or so.)


It looked even worse just after stirring in the eggs, but as it heated up again, it smoothed out beautifully. For this, you really need to go by the thermometer reading to know when it is done -- there was no dramatic change in texture.


OK, into the fridge with an occasional stirring until it gets down to room temperature. Lovely! Now, beat up some softened butter and gradually beat in the white chocolate custard. Then let sit for 1 1/2 to 2 hours.

At this point my husband started saying, "So, is it cake yet?" with increasing impatience. He likes simpler desserts that don't keep him waiting as long!

So, while we're waiting for the frosting, let's put together some of the cake layers. The recipe calls for splitting each layer and filling with lemon curd. Splitting my poor little flat cakes looked like it was going to be a royal pain -- and result in even more cracked cake. (I really should have remembered that white chocolate...Sigh.) OK, go to Plan B -- let's leave it at two layers and just put a really thick layer of lemon curd in between. Hey, I like that idea! And my lemon curd is nice and thick, not runny at all. See? (If you look closely, you can see the crack in the layer, too.) Wrap it up and put into the fridge for a while...


The frosting got to rest for about an hour and 15 minutes ("When will it be cake?") before I beat in a bit of the lemon curd. A taste test revealed only a faint taste of lemon. Now, I like my lemon desserts to be lemony. They may not have to shout "LEMON!!" (although I don't mind if they do), but they at least have to state "Lemon!" with a bit of emphasis. So I pulled out the jar of Penzey's lemon extract and the jar of frozen lemon zest/sugar/vodka and started doctoring it up. It took several additions before I was happy with the taste. It was still only saying "lemon," but at least the white chocolate had receeded to the background. That's where I prefer it. I'm not a fan of white chocolate, although it can be nice as a subtle whisper.

The cake got a crumb coat and a brief rest in the refrigerator, then the final coat of frosting. At this point the cake is supposed to chill again, but the cries of "Cake now!" were getting louder, not to mention that it was getting late. If I didn't finish up this cake now, we'd have to wait until tomorrow. "Unacceptable!" was the unanimous decision on that idea.

But, I am a food blogger, after all. Since I didn't have time to make the frosting all smooth and lovely, I settled for some rustic vertical spatula swipes up the sides. And we had to have some swirls of lemon curd on top! That was problematical because the buttercream was room temperature and quite soft and the curd was cold and quite firm. But eventually (fairly quickly, actually) I managed a sort of giant daisy/sunflower effect with a nice blob of lemon curd in the center.


It's cake! And very good cake too.

And what did I learn this time?
1) Lemon curd is sublime. Totally worth those left-over egg whites. Well, I already knew that, but I was reminded again.
2) Don't forget the white chocolate!
3) Don't mix types of cake strips. Who knew?
4) Eggs really are great emulsifiers.
5) A fancy cake project does better when spread out over several days. (I'm sure my husband will be happy to remind me of this. Or to say "is it done yet?" if I forget.)
6) Even a less-than-perfect cake can be delicious!

Tuesday, November 10, 2009

TWD: Cran-Apple Crisps

This week I'm actually posting the TWD recipe of this week, Cran-Apple Crisps, chosen by Em of The Repressed Pastry Chef. You can find the recipe on her blog.


Mine are actually cranberry and pear crisps, because the pears really, really needed to be used up NOW. And I did half the batch with coconut in the topping, as Dorie calls for, and half with chopped almonds. (I wasn't sure if we'd like the coconut.)

I made half the recipe, in four creme brulee pans, and used about 2 1/2 pears (after getting rid of the bad spots). Pears are less tart than apples, so I added a bit of lemon juice and cut the sugar down to about 3 1/2 tablespoons (for the half recipe). And I don't like flour as a thickener for pies and crisps, it takes too long to thicken and has too much of a flour-y taste, so I substituted potato starch -- about 1 1/2 teaspoons for a half-recipe with pears. Oh, and I threw in a few more frozen cranberries - about 2 Tablespoons more. The filling was great! I wish there had been a bit more, though. Something to remember for next time, and there will be a next time!

And the topping? It had whole wheat flour, but you really couldn't tell it was there. The version with coconut was a little sweet for my taste, but good. The version with almonds was also good. I think I'll do both next time! But I'll cut the sugar down a little -- unless I use unsweetened coconut.


This is the first use for these creme brulee pans. They'll be seeing more use for these crisps, I think! Who knows, maybe someday I'll even use them for creme brulee...

Heavenly Cake Bakers: Baby Chocolate Oblivions

This week's project for the Heavenly Cake Bakers was the Baby Chocolate Oblivions from "Rose's Heavenly Cakes." These are a flourless chocolate mousse, baked as mini-cakes in a water bath. Wow! Chocolate delight! So smooth, creamy and luscious!


Rose originally published this recipe in "The Cake Bible," pages 84-87, as a single large cake. I took a look at that recipe and found many tempting (and amusingly named) variations -- Chocolate Torture (with a layer of fudge sauce), Chocolate Dependence (with liquor or liqueur), Chocolate Indulgence (with praline paste), Chocolate Flame (with raspberry puree).


So mine are Baby Chocolate Dependences, actually. I made 1/6 of the recipe -- just two servings -- and added a bit of raspberry liqueur (1 teaspoon for my reduced recipe). Unfortunately, while this liqueur tastes great alone, it isn't strongly flavored enough to stand up to all that chocolate. I could barely tell it was there in the cakes. The liqueur flavored whipped cream worked out, though. And my black raspberry puree (from our own berries) added the perfect note.

As I don't have silicone muffin pans or cups and didn't get around to buying any, I went with ceramic ramekins, well buttered. I covered them with a tent of aluminum foil for the second part of the baking. They puffed up quite a bit, like little souffles, and then fell back down again as they cooled. My husband did a most capable job of unmolding them -- running a small spatula around the edge, then dipping each ramekin in hot water and inverting onto the serving plates. There was about a teaspoon's worth of chocolate mousse cake left in the pans, which we scraped out and spread evenly on the top of the cakelets. Hey, the whipped cream hid most of the top anyway!

These are wonderful! My only quarrel with this recipe is that Rose says (in The Cake Bible) that it doesn't freeze well -- the texture changes. I would love to make a bunch of these and freeze the extras. Perfect for a special dessert when we both are hit by a chocolate craving.

I'll have to take a look at some of the other chocolate mousse cake recipes out there. Maybe the addition of a small amount of starch (cornstarch, potato starch) would help stabilize the texture when frozen?

Talking of other recipes, I used Scharffenberger 62% chocolate for this (one of the brands Rose recommends) and was most amused by the recipe that came inside the box -- Chocolate Orbit Cake, adapted from a recipe by David Lebovitz. Guess what, it's a flourless chocolate mousse cake baked in a water bath! The main differences are that it has a lot more sugar and is baked at a lower temperature for a longer time.

Next time, I'm going to try the Chocolate Flame option with a puree of our home-grown black raspberries. And if Santa Claus is good enough to bring some of those lovely fruit essences from La Cuisine, I'll add a drop of raspberry essence. Heavenly!

Sunday, November 8, 2009

TWD on Sunday: Sugar-Topped Molasses Spice Cookies

This month, we're allowed to bake out of order for "Tuesdays with Dorie." So I chose the Sugar-Topped Molasses Spice Cookies, chosen by Pamela of Cookies with Boys for November 17. You will be able to find the recipe over on her blog soon.


Other than using part whole wheat flour, I followed the recipe. Love the addition of ground black pepper! The dough was very sticky. Instead of making 24 cookies, I divided the dough into smaller pieces and made 36 cookies. Good thing I did, as they wouldn't have fit into my cookie jar otherwise! And even though they were smaller, I could only fit 9 per baking sheet. They spread a whole lot.

Here's my first attempt, with 12 per sheet.

Next try, 9 per sheet. Better.

I'm still looking for my ultimate ginger cookie recipe. It should be thicker than this recipe, less sweet, and more gingery. Crunchy on the edges and chewy on the inside.

Until then, these were mighty good!

Monday, November 2, 2009

Heavenly Cake Bakers: Pumpkin Cupcakes

This week the Heavenly Cake Bakers made the Pumpkin Cake with Burnt Orange Buttercream for Halloween. I didn't have (and didn't want to buy) the special pumpkin-shaped Bundt pan, so I did cupcakes instead.


Sorry, not very many pictures this week. I was in a bit of rush. Above you see the last cupcake, photographed on my desk at work. The cupcakes went into the office for our ongoing bake sale and soon disappeared.


For me, this recipe yielded 22 regular-sized cupcakes. I could have filled the liners a bit less full and gotten a full 2 dozen, but I think they look better at this size.

My cupcakes were made with 1/3 whole wheat pastry flour, 1/3 bleached all-purpose flour, and 1/3 bleached cake flour (by weight). Other than that, I followed the recipe. The cupcakes took roughly 20 minutes to bake at 350 degrees -- sorry, didn't time them exactly.

I was very, very happy with this cake recipe! The cupcakes had a wonderful texture and flavor, very balanced between sweet, nutty, spicy, pumpkin-y, with just a bit of crunch from the nuts. It really didn't need frosting. I don't ever need to try another pumpkin cake recipe again! (Although I will be -- the Holiday Bundt Cake for Tuesdays with Dorie is coming up soon.)

In fact, I think this cake would be great as a plain Bundt cake with just an ornamental dusting of confectioner's sugar, or as a couple of plain loaf cakes. For a more casual, heartier cake I'd increase the nuts to 3/4 cup and add some raisins or dried cranberries.

The Burnt Orange Silk Meringue Buttercream frosting is quite time-consuming to make. I spread the process out over several days -- made the caramel creme anglaise on one day, refrigerated it, then finished the frosting another day and frosted the cupcakes on yet another day. I had great plans to pipe the frosting onto the cupcakes, but ran out of time and settled for a few quick swipes with a spatula.

I made double the recipe of frosting, though, so the leftovers are in the freezer waiting for another batch of cupcakes. I'm thinking orange-flavored white velvet cupcakes, to use up some of the many containers of extra egg whites...

Oh, I did make one change to the recipe. The Mousseline Buttercream I used on last week's cake got very soft sitting out on the bake sale table at the office. I consulted some of the buttercream recipes in Shirley Corriher's "Bakewise" and saw that she used 3 parts butter to 1 part vegetable shortening (by weight, not by volume). So I tried doing that, using 12 ounces of butter and 4 ounces of Spectrum Organic shortening. It was still soft, but did hold up a bit better. And it still tasted good!

Oh, I also added about 1/4 cup extra sugar to my double batch of frosting, because I know my co-workers are used to very sweet frosting. It still was no-where near as sweet as the horrible stuff on grocery-store cakes. Personally I preferred it before the extra sugar and before the orange food coloring, and would do that if baking just for the two of us.

Tuesday, October 27, 2009

TWD: Cherry-Fudge Brownie Torte

This week's project for the Tuesdays with Dorie group was a Cherry-Fudge Brownie Torte, chosen by April of Short + Rose. Check out her blog for the recipe, or see another version on Epicurious.


I love chocolate, cherries, and mascarpone, so I was really looking forward to this recipe. But frugality suggested a half-recipe. Some of the folks in the Problems and Questions forum said a 6-inch springform was a little small for a half-recipe, so I went for a 7-inch springform instead. That was perfect.

Here's my favorite brand of dried tart cherries, from Door County, Wisconsin (famous for cherries). And here's a link to their Web site -- they do mail order, folks!


I made half the recipe for the brownie portion, but 2/3 of the recipe for the mascarpone mousse topping, because I had an 8-ounce container of mascarpone and didn't want to have 2 ounces left over. And topped it with home-made cherry jelly, piped in spokes and then swirled around in circles. All seemed well. Doesn't that torte up above look wonderful? It's been chilled overnight.

Here's what happened when I unmolded it, though.


It's a mousse landslide! Looks like a steep hillside after a heavy rain...

I think perhaps it was because I had frozen and thawed the mascarpone. At least, that's my current theory.


But it tasted good anyway. Although we thought the brownie base was a bit too dense and hard when chilled. It would be better at room temperature or even warm, perhaps topped with a scoop of cherry vanilla ice cream.

And the mousse was a little bland. I'd have liked some cherries in there, too. And some unflavored gelatin to thicken it up! I have another 8-ounce container of mascarpone in the freezer. Maybe it will end up in a slightly different Black Forest Torte some day...

Monday, October 26, 2009

Heavenly Cake Bakers: Almond Shamah Chiffon Squares

Welcome to this week's installment of the Heavenly Cake Bakers! This week's project is the Almond Shamah Chiffon Cake from "Rose's Heavenly Cakes" by Rose Levy Beranbaum. What's a "Shamah," you ask? It's the last name of one of Rose's friends, assistants and advisors, David Shamah. He challenged her to develop an almond chiffon cake recipe that could be baked in a flat pan rather than a tube pan.

I made mine into cake squares so they would be easier to sell at our office bake sale. (We're having an ongoing pre-Christmas bake sale to benefit a local charity.) So, I used two 8x8 inch square pans rather than two 9-inch round pans. And I used up the last of a batch of Orange Mousseline Buttercream (also one of Rose's recipes, but from her earlier book The Cake Bible) rather than using the whipped cream frosting. I'd had the frosting in the freezer for longer than I like to admit, and it was high time to use it up.

Here are the finished cakes:


By the way, I'm developing a theory of "simple cake decorating," which is that almost any pattern, repeated, will make your cake look nice. Even if the pattern isn't really all that regular. Sort of like what Elizabeth Zimmermann said about knitting, that a mistake repeated becomes a pattern.


And here's a picture of the crumb -- isn't it nice and light? I am beginning to think that I really prefer sponge cakes. I love that light, springy texture.

I followed the recipe closely. One change -- as I had some almond flour in the freezer, I decided to try toasting the almond flour rather than toasting and grinding up almonds. I just spread the flour in a skillet over medium heat, then turned the heat down and whisked frequently once the flour heated up. It was hard to tell by color when it was done -- it does turn a bit darker, but your nose is the very best guide. I stopped when it smelled nice and toasty, but not burnt. And I measured it by weight not volume.

Speaking of measuring by weight, this recipe calls for 8 egg yolks. Here are my egg yolks:


Notice there are 9 of them? I cracked open an extra egg just in case. And guess what? These weren't enough! I had to use another egg yolk (10 in all) to get up to the proper weight of egg yolks in the recipe! These were the proper size eggs (large), too. Egg yolks really ARE getting smaller these days.


Here's one of my two 8-inch square cakes just out of the oven. They smelled lovely. After cooling, I wrapped and refrigerated them for a couple of days until I was ready to assemble the cake.

Here is one of the cakes after trimming the top and bottom and edges, and syruping. My "cake board" is just a piece of an old cardboard box, covered with aluminum foil.

Lots of cake crumbs! I toasted them a bit, ground them up in the food processor, and put them into the freezer. There's a Nick Malgieri chocolate torte recipe that calls for cake crumbs...I think I have enough now.

On to the frosting. I had about 3 to 3 1/2 cups of frozen orange-flavored buttercream. Above is what it looked like when thawed, but still cold. Looks ghastly and curdled, right?

But, just put the bowl into a pan of warm water to bring it up to the right temperature, and beat it again, and Voila! It's buttercream again. Yes, this is really the same stuff, just a few minutes later.

So, what's the final review? I loved the texture of this cake -- airy, light, springy, yet tender. The almond flavor was subtle, maybe a bit too subtle to stand up to the orange buttercream (which I'd punched up with Grand Marnier and extra orange zest). I suspect the whipped-cream-and-jam frosting would have been better. Still, no complaints! And I think this is my first chiffon cake ever. It was fun!

And the pan was empty when I brought it home from work. Success!