Tuesday, October 28, 2008

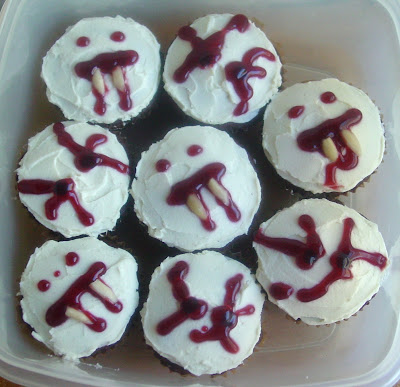
TWD: Chocolate "Vampire and Vampire's Victim" Cupcakes

This week for Tuesdays with Dorie, we made "Chocolate-Chocolate Cupcakes," from pages 215-217 of "Baking: From My Home to Yours." Clara of I Heart Food4Thought chose the recipe and challenged us to decorate them for Halloween!


I can't remember the last time I made cupcakes. (Of course, my memory has never been the greatest and it hasn't improved any with age...) I'm pretty sure I've never decorated them before. So please forgive my amateur efforts -- I did have lots of fun!

Since my husband and I were (and are) huge fans of "Buffy the Vampire Slayer," a vampire theme came immediately to mind. Of course, that meant changing the chocolate icing to something more pale...drained of blood, so to speak. So I went for a White Chocolate Cream Cheese Icing from Rose Levy Beranbaum's "The Cake Bible." And for the blood? Cherry jelly -- I love the combination of cherry and chocolate! A cherry jam filling completes the taste combination.

For the recipe for the cupcakes, please check out Clara's blog. I added a little bit of almond extract (1/2 teaspoon), but otherwise stayed with the recipe. There was much discussion on the P&Q section on flour types & weights, baking times and so forth. I decided to use bleached all-purpose flour and use a weight of 4.8 ounces per cup of flour. I used paper cupcake liners and put my cupcake pan on an insulated baking sheet to bake. It took about 22 minutes. By that time the corner cupcakes were done, and the center ones were very slightly underdone. They were good, and not dry at all.


Rose has not published the frosting recipe on the Web, and so I recommend you take a look at her book -- see page 237-238. I made half of the recipe, added 1/2 teaspoon almond extract, and reduced the lemon juice slightly. It made more than I needed, but that's OK.

For the filling, I used a home-made sour cherry jam. You could also use Morello cherry jam or canned sour cherry pie filling. For the jam:
20 ounces frozen unsweetened sour cherries
1 teaspoon Pomona's pectin (amount needed to thicken 2 cups of fruit puree)
1/4 cup granulated sugar
2 Tablespoons home-made maraschino cherry liquid (a mixture of cherry juice, brandy, sugar and almond extract)
Thaw cherries, at least partially, so you can puree them. Pulse in the food processor until they are in coarse chunks. In a small bowl, whisk together pectin and sugar. Place cherries in saucepan and bring to boil. Slowly stir in pectin and sugar. Bring to boil, then simmer for about a minute until mixture thickens. Stir in maraschino cherry liquid. (You could use brandy and almond extract instead.) Pour into a storage container, cool, and store in refrigerator until needed.

For cherry jelly:
3/4 cup frozen sour cherry juice concentrate (I used Old Orchard 100% tart cherry juice)
10 Tablespoons water
2 Tablespoons sugar
1 1/2 Tablespoons Sure-Jell no-sugar-needed pectin mixture
2 Tablespoons home-made maraschino cherry liquid (or some brandy & almond extract)
Place juice concentrate and water in saucepan and bring to boil. Place sugar and pectin in small bowl and whisk together. When juice boils, slowly stir in sugar/pectin mixture. Bring back to boil, then simmer for about a minute, until mixture thickens. Remove from heat and stir in maraschino cherry liquid. Place in storage container, cool, and refrigerate until needed.

I ended up not being happy with the consistency of my cherry jam. Pomona's pectin does make a rather stiff jam. I may stay go with Sure-Jell or Ball in the future, even though they have more additives. I stirred about half of the cherry jelly into the jam, reserving the rest for decorating. That improved the jam a lot.

To assemble: Use your favorite method to fill the cupcakes with cherry jam. (I've never filled cupcakes before, so don't have a favorite yet! I used the "cut a cone" method.) Put on a light crumb coat of frosting. Chill to set crumb coat, then add final coat of frosting. Chill to set.

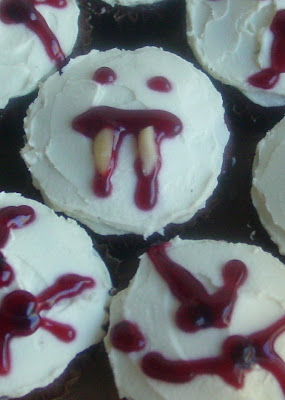
For vampire victims, poke two holes in the frosting with the end of a chopstick, for fang marks. Warm the cherry jelly slightly, and place in squeeze bottle. Squeeze jelly "blood" into the "fang marks," dribbling it down artistically.

For vampires, squeeze a line for a mouth, with lines of blood dripping down, and two dots for eyes. Add two slivered almond pieces for fangs.
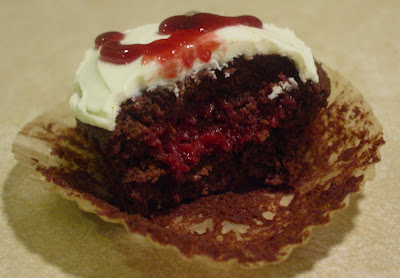

Bite in and enjoy!

Tuesday, October 21, 2008

Pink Apple and Cranberry Galette

Here's the latest Bungalow creation -- an Apple-Cranberry Galette, made with Pink Pearl apples (they're pink on the inside, too)!


A quick description: a flaky cream-cheese pie crust is spread with a thin layer of easy home-made apple-cranberry jam (from frozen juice concentrate), then topped with thinly sliced pink apples and dried cranberries moistened with more apple-cranberry juice and the remaining jam. This was inspired by the Heavenly Peach Galette posted on Rose Levy Beranbaum's blog, with some ideas from Dorie Greenspan's Summer Fruit Galette as well.

For the pastry dough, I used Rose Levy Beranbaum's Cream Cheese Pie Crust, from her "Pie and Pastry Bible." (Her latest version of this crust can be found here.) However, instead of bleached flour or Wondra, I used 122 grams of unbleached pastry flour and 62 grams of unbleached all-purpose flour. I mixed the dry ingredients, cream cheese, and butter in the food processor, then dumped the mixture into a bowl and stirred in the vinegar and cream with a fork. I needed about an extra tablespoon of cream to bring the dough together -- perhaps because I was using different flour. I turned the dough out onto a clean surface and did a quick "fraisage" -- this really helps keep the galette dough from cracking. Thanks to Cooks' Illustrated for the idea.

I love this crust! It is very flaky and easy to work with. Be sure to use a "soft" (low-protein) flour to make it, though, or it will be tough. (I speak from experience.) The water in the cream cheese develops the gluten more than in regular pie crust.

I refrigerated the dough overnight, then froze it until I was ready to bake.


Filling:
5 medium-size organic Pink Pearl apples (they have pink flesh)
about 2 teaspoons lemon juice
about 3 Tablespoons cranberry-apple juice frozen concentrate (not diluted)
about 3 Tablespoons sugar
1/8 teaspoon ground cinnamon
pinch of fresh grated nutmeg
about 1 Tablespoon potato starch
about 1/3 cup dried sweetened cranberries

Jam:
about 3 tablespoons water
about 8 tablespoons cranberry-apple juice frozen concentrate
cores and trimmings from apples
about 2 Tablespoons sugar

Crumbs:
I used 2 teaspoons of semolina, but would have preferred to use a couple of tablespoons of crushed Amaretti or vanilla wafers. I just didn't have any on hand.

Place water and juice for jam into a small saucepan and bring to a simmer. Put the cranberries in a bowl and pour enough of the hot mixture over to cover. Let sit while you prepare the apples.

Wash the apples well, but do not peel. Cut in half, then remove stem & blossom ends with a paring knife and core with melon baller (thanks to Nick Malgieri for this tip). Discard any dirty or nasty-looking bits and place the rest of the cores and ends into the saucepan with the remaining juice. (Seeds are O.K. -- you will be straining it later.) Rub the cut areas of the apple halves with a bit of lemon juice.

Mix the lemon juice and cranberry juice for the filling and place in large bowl. Lay each apple half cut side down and trim off a little bit from stem and blossom ends. (These also go into the jam saucepan.) Cut apple into thin slices, cutting parallel to the "equator" of the apple. As you slice each half, place slices into bowl and toss gently to coat with lemon/cranberry juice. Sprinkle with cinnamon, nutmeg, sugar and potato starch and mix gently just to combine. Cover and set aside.

Set a rack in the middle of the oven and set a pizza stone or heavy metal pan on the rack. Preheat the oven to 400 degrees Fahrenheit. Have ready a round pizza pan at least 10 inches in diameter, or a baking pan large enough to hold the galette.

Drain the excess juice from the dried cranberries and add that juice to the jam saucepan. Bring the jam mixture to a boil, then reduce to a simmer. Simmer for about 20-30 minutes, until apple flesh is very soft. Strain through medium sieve, pressing so that pulp goes through and only peels, seeds and the hard bits from the core remain. Return strained jam to saucepan and continue simmering until thick and "jammy." Put into metal bowl and set in freezer for 10 minutes or so to cool.

Roll out pie dough on a sheet of parchment paper to about 14 inches in diameter. Trim any edges that extend too far and use them to patch the parts that don't go far enough. Continue rolling out the outer edges of the dough, but leave the center 11 inches or so alone. You want the outer 2 or 3 inches of the dough to be extremely thin. The dough should be about 18 inches in diameter when you are done.

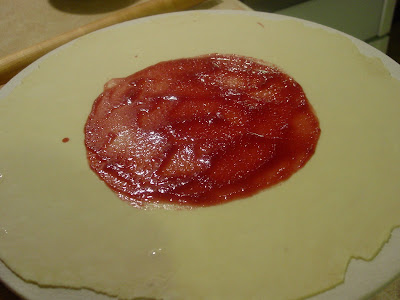
Spread some of the cooled jam in a circle in the center of dough, about 10 inches in diameter. (I tried using a pastry brush for this, but it didn't work all that well. What worked was spooning the jam on, then smoothing it with the back of the spoon.) Sprinkle the crumbs in a thin layer on top of the jam. Arrange the some of the apple slices in a layer over the jam & crumbs, strew some of the cranberries over them, and repeat until all the apples and cranberries are used up.


Bring the edges of the dough up over the filling, pleat and smooth down. Pour more jam on top of the center of the galette -- as much as will go in. Brush pastry lightly with water and sprinkle with sugar or superfine sugar. (I didn't do this -- but it's what I would do next time.)

Use parchment to transfer galette onto pizza pan or baking pan. Place onto pizza stone or hot baking pan in oven. Bake for 10 minutes at 400, then turn heat down to 350 and bake until crust is brown and filling is bubbling in center. It will take about an hour to bake.

I tried brushing the galette with diluted cranberry juice about 15 minutes before it was ready. I hoped this would make the crust pink, but instead it turned really brown. I didn't like the effect. So much for that idea. I suppose I could sprinkle it with red or pink decorating sugar, but...that sounds like too much work. And I don't like to use artificial colors. So, no pink crust -- it was still delicious!

TWD: No Pumpkin Muffins this week

Sorry, folks, I've been doing other baking this week and did not make the Pumpkin Muffins. I did try an adaptation of the Caramel-Nut-Topped Brownie Cake, and made a Pink Apple and Cranberry Galette that is just about to come out of the oven. See you next week for the Chocolate-Chocolate Cupcakes. Meanwhile, please head over to Tuesdays with Dorie and check out all the fabulous pumpkin muffins!

Saturday, October 18, 2008

TWD Adaptation: Brownie Cake Revised

Like some of the other TWD-ers, I wasn't completely happy with the recipe for the Caramel-Nut-Topped Brownie Cake. I thought it was too dry and not dense or chocolate-y enough. So, I decided to experiment with modifying the recipe.


My Baking Adventures had posted a brownie recipe from Marcel Desaulniers, used to make "Death by Chocolate." More chocolate -- less flour -- sour cream -- yum! I decided to more or less "take the average" of this recipe and Dorie's recipe and see what came out.

Here was my first try at a revised recipe:

Place oven rack in center position. Preheat oven to 350 degrees F. Grease an 8-inch round cake pan, line bottom with greased wax paper, and dust with flour. Set pan on a baking sheet and place a silicone cake protector strip around it.

For the cake:

6 Tablespoons unsalted butter (3 oz / 85 gm), cut up
6 ounces bittersweet (70%) chocolate (170 gm), cut up
a tiny pinch of hot chili powder
2/3 cups unbleached all-purpose flour (93 gm)
2 Tablespoons cocoa (16 gm), sifted after measuring
3/4 teaspoon baking powder
1/4 teaspoon salt
1/4 teaspoon cinnamon
3 large eggs (150 gm)
1/4 cup dark brown sugar (59 gm)
1/2 cup granulated sugar (100 gm)
1 teaspoon vanilla
1/4 cup sour cream (20% butterfat) (61 gm)

In double boiler, melt butter, chocolate and chili powder. Set aside to cool slightly.
Whisk together flour, cocoa, baking powder, salt, and cinnamon. Set aside.
Whisk together eggs and sugars until well mixed. Whisk in vanilla and sour cream. Whisk in chocolate mixture. Whisk in flour mixture just until combined.

Pour into pan and smooth top. Bake for about 25-30 minutes, until edges are done and center is set but slightly underdone. Let cool. Remove from pan and peel off waxed paper. Top or frost as desired.


I made a half-recipe in a 6-inch pan and baked it for just 22 minutes -- that's all it needed. The cake was domed when it came out of the oven, but fell slightly in the center. I topped it with leftover caramel and toasted pecans, as per Dorie's recipe.


The verdict? This was a much better chocolate cake -- rich, tender and full of chocolate flavor. It still was more like a cake than a brownie, though. I guess I'll have to try cutting down the flour some more. Also, for a more flat and even top, I will increase the baking powder slightly.

Friday, October 17, 2008

House Upkeep: Front Porch Painted!

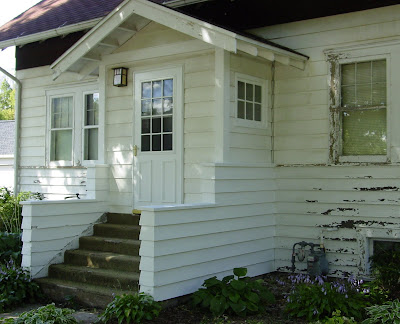
Success!! The bottom section of the front porch is repainted! It looks so much better!


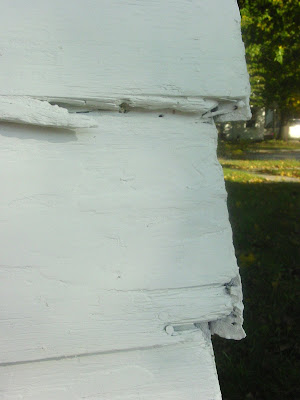
If you take a closer look, though, you see that some parts are not in good shape.


Jim, working on the windows to one side of the porch. (They are now done.) He did most of the scraping and painting work on the porch, and all of it on the windows.


Still a lot to be done -- next year!

Tuesday, October 14, 2008

TWD: Lenox Almond Biscotti

This week's Tuesdays with Dorie recipe was Lenox Almond Biscotti. Thank you Gretchen of Canela & Comino for choosing this recipe!


When I think, "I'm going to bake cookies--what shall I make?" biscotti are not usually at the top of the list. But as soon as I saw these biscotti had cornmeal in them, I knew I'd like them. Maybe it's the Southern heritage on my Dad's side. I love baked goods with cornmeal!

Now, should I stay with the basic recipe or do one of the many variations? In the end, I made lemon-flavored almond biscotti, using the zest from two very small lemons plus 1/2 teaspoon lemon extract, 1/2 teaspoon almond extract, and 1/2 teaspoon vanilla. I added about 1/4 cup chopped dried cranberries to one-half of the dough, and 1/4 cup chopped crystallized ginger to the other half.

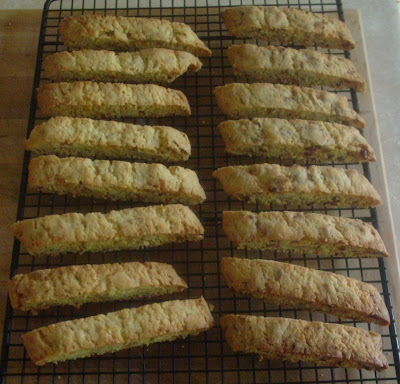
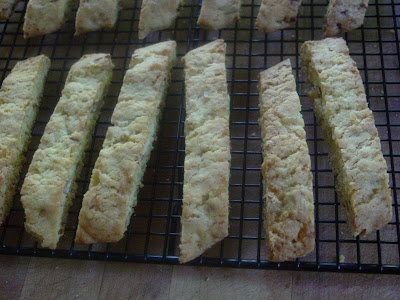
As I was doing my usual late-night baking, I wrapped up the dough logs and put them into the refrigerator until the next day. This turned out to be a great idea, as it also made the dough much easier to handle. The next evening, I finished shaping the logs and let them warm up a bit while preheating the oven. The first baking took longer than the 15 minutes in the book -- more like 25 minutes. They spread out a fair amount. After cooling the dough for half an hour, I sliced it diagonally. Three-quarters of an inch seemed just too thick, so I went for a half-inch instead. Jim and I shared the ends of each log and agreed they were really good. (Perhaps some day I will try these as "uni-scotti." It might work to freeze the dough in a roll or log and cut into slices before baking once.)

For the first baking, I used 350 degrees on a plain bake setting. For the second one I used 325 degrees on convection bake. I came back exactly 15 minutes later and wished I'd checked on them a little earlier -- the ones from the smaller (cranberry) log were a bit too brown. The ginger ones were perfect.

They were good right out of the oven, but even better after aging for a day or two. The flavors melded and became more balanced. The lemon-ginger ones were our favorite. We could barely taste the cranberry in the other ones.


Conclusion: home-made biscotti are yummy! They will be on the cookie baking list in the future. What I'd do differently next time: reduce the sugar to 2/3 or 3/4 of the original amount. These were too sweet for our tastes. And if I'm going to divide the dough in half, I'd divide it more evenly next time. I'd definitely make the lemon-ginger again. I'd like to try cranberry-orange next time, too, using more cranberries and not chopping them up.

If you want the recipe, you can find it on page 141 of Dorie Greenspan's "Baking: from My Home to Yours." Or hop on over to Gretchen's blog. While you're there, check out some of her pictures and stories about Peru. And check out all the other wonderful variations from the other TWDers, too!

Wednesday, October 8, 2008

Tuesdays with Dorie: "Turtle" Cake

This week's adventure for Tuesdays with Dorie was the Caramel-Peanut-Topped Brownie Cake, chosen by Tammy of Wee Treats by Tammy. What a delicious choice!


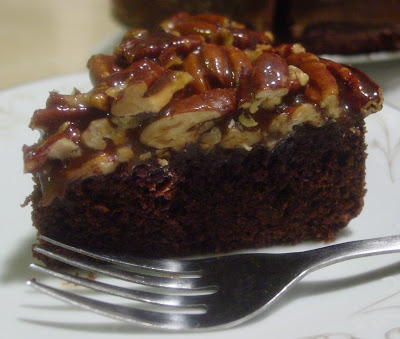
First, I have to say that I don't share Dorie's fondness for chocolate and peanuts together. Separately, great! Together, not so much. I used pecans instead. Chocolate, caramel, pecans -- it's a Turtle cake!

For those who've never seen one, a Turtle candy is made of a disk of caramel coated with chocolate, with pecan halves sticking out at the edges. They really do look like a turtle. I loved Turtle candies in my youth and later fell head-over-heels for Turtle sundaes at Michael's Frozen Custard. No doubt they have contributed to my "well-padded" figure.

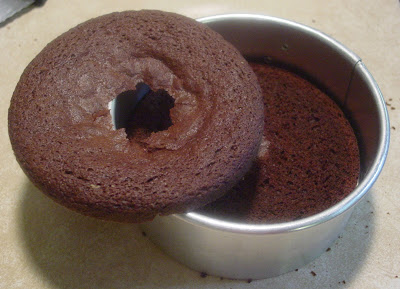
I made half the recipe for the brownie cake and baked it in a 6-inch round springform pan. Unfortunately, I didn't check on it soon enough. After 35 minutes in the oven, it was well-done in the center and ended up rather dry.


The edges of the cake rose enthusiastically, but the center hardly rose at all. I ended up with a "crater cake." If it had just been a little bit of a crater, I might have gone ahead with it, but with this deep crater I decided to cut off the top of the cake. (The top got crumbled into bits and mixed with extra caramel and pecans. It's now waiting to get mixed into some vanilla ice cream. No wasting of chocolate in this house!)


I toasted the pecans on a pan in the oven and sprinkled on some salt. Drat! The salt didn't stick, so I tossed the warm pecans with just a little bit of softened butter. Hey, that worked! The melted butter coated the pecans and the salt stuck just fine! I made a full 1 cup of pecans because, hey, we can always find a use for some extra pecans around here! Good thing I did, because I ended up putting 3/4 of a cup of them onto my half-sized cake. Let's hear it for more pecans!

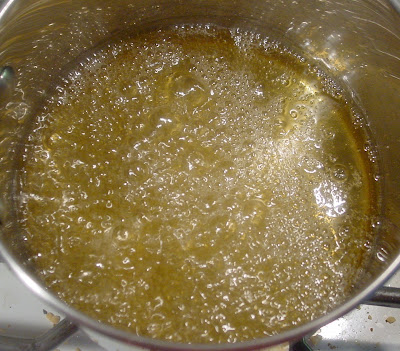
On to the scary part -- making caramel. I've never made caramel before. I've made a sugar syrup for an Italian meringue and it didn't turn out so well -- all grainy and crystallized. I decided to make the whole caramel recipe, since Dorie said it was easier that way. I had everything ready in advance -- including a bowl of cold water and an ice pack from the freezer in case of burns. (Very handy things, those flexible ice packs. I always keep a few standing by in the freezer, just in case...and the little plastic "ice cube" thingies are great for very small burns. I don't ever put them in my drinks, though -- something about having little plastic thingies in my iced drink just freaks me out.)


My caramel took a while to turn color. I didn't time it, but it must have been at least 15 minutes, maybe 20. Next time I think I will turn the heat up more at the beginning, then reduce it when the caramel is starting to turn color. The "white plate" test was very helpful -- without it, I would have pulled the caramel off the heat long before it was really done. I think I let it go just a bit too long -- it was pretty dark. I followed Dorie's advice to wash down the sides of the pan with a pastry brush dipped in water and then to NOT STIR. It worked! No crystallized, grainy sugar this time!


Oh, what a lovely cake it turned out to be! Small pieces were more than enough. Rich, chocolatey, gooey, sweet, crunchy -- wow.


Conclusion: the topping was heavenly. Gooey-but-not-too-gooey caramel, toasted pecans, salt (it really does go well with caramel). The cake could have been better. Part of that was my fault for overbaking it. Even allowing for that, we both agreed we wanted a denser, fudgier, more brownie-like cake. Not completely fudgy -- that would be too much -- but more. Oh, and we wanted more chocolate. OK, we're chocolate fiends. We admit it.

I can see myself making this cake again, but with a different recipe for the bottom layer. (In fact, maybe I'd better. I need to use up the extra caramel.) I'm so happy about my first caramel-making!


If you want the recipe for this cake, hop on over to Tammy's blog, or better yet, go out and buy the book! And if you want to join in on our weekly baking adventures, better hurry! Membership in TWD is closing at the end of October.